Put on your Mask

I keep getting asked how I get my images to look as “crisp” and “sharp” as they appear to be. First, I point them to my workshops page and ask them to consider professional instruction. After all, that is exactly how I started several years back. Then, I let them know that proper focus is the most critical element of crisp, sharp imagery. I know, duh right. But, without proper focus right at image capture, your image is dead in the water. Period. So start by having a good read of your camera manual and get to know its capabilities with respect to focus (focus points, auto vs manual modes, etc). My good friend and Discover BC Photo Tours co-founder Kelly Funk has done a great two-part tutorial on the topic of focus, so I will simply recommend you have a look here.

So, you’ve signed up for a workshop AND you have read Kelly’s blog so many times that you could recite it blindfolded, while standing on your head, if so asked. You are now creating images that are properly focused (and properly exposed of course). But, your images still aren’t smoking sharp and crisp. What now? Two words that should from this point forward be forever entrenched in your brains: Unsharp Mask.

Contrary to its name, the Unsharp Mask tool in Photoshop is an application used to sharpen images. It helps to emphasise texture and details and I use the Unsharp Mask tool (to varying degrees) to finish almost every image I create. It is usually the last step in my work flow before I consider an image done. How does it work? Who cares. But, if you find you do care, then you can learn more about the science of the application right here. In the meantime, for those that just want to see how to apply it and what immediate results it can produce, let’s move on. Unsharp Mask can be found in most photography editing software, but I’ll use Photoshop for the sake of this tutorial.

Start Photoshop and open up an image that is properly exposed and in focus. In the top tool bar, click on “Filter” tab and under the drop down menu, hover your mouse over “Sharpen”. A list of sharpening options will appear, select “Unsharp Mask.”

The Unsharp Mask window will come into your screen view. You will see three options; Amount (%), Radius (pixels) and Threshold (levels). For me, Radius is always at 1.0 pixels and threshold at 0. It is the Amount lever that I play with depending on the intensity of sharpening I want. I usually add at least 50%, but normally I would add about 100 % to most images. I have gone as high as 175 % in rare cases. Play around and see what results you get. The Preview button lets you see the results before applying the Mask.

Now, you may not see dramatic changes (especially at 50 %) to your image in full view. Where you will really see the difference is when you are zoomed into a particular scene within your image.

Before Unsharp Mask

After Unsharp Mask

You can really notice new detail on the leaves in the forest foreground after the Unsharp Mask was applied.

So have fun with the tool. It may take a little time and practice to really understand the full dimensions of it, but you will notice immediately that your images appear sharper, crisper and more rich in texture and detail.

Now, about that workshop you need to sign up for… 🙂

Hey is that a new lens, baby?

I love discovering new tricks in Photography. Especially tricks that save me money by not having to purchase new equipment. Case in point is this constant nagging in my consumer-driven psyche to purchase a Lensbaby lens to capture that dreamlike, selective focus effect that I fall for every time. I know that the lens would have been quite fun to play with…for about a week. After which, it would likely stay buried deep in my camera bag talking about its glory days with my never-again-used Armageddon Red ND Filter that I just had to have when I first started photography. A filter that would turn any sky a deep, unrealistic red. Good impulse buy Robinson. Real good. That filter rendered one good image in the several years I have owned it and the minimal times I even used it.

Aliens are coming...to get my red filter

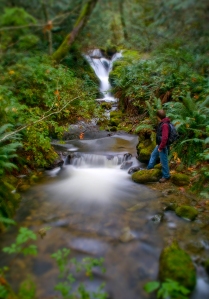
So here I was contemplating another ridiculous spend, when my good friend and pro photographer Kelly Funk passed on a great tip in Photoshop that will produce the same effect as a Lensbaby…when applied correctly. It gives you that dreamy, hallucinogenic-mushroom, Disney Viewmaster type of look and feel. Basically allowing you to keep one element of your image in sharp focus (subject), while blurring the rest of the image elements to look like you just put in eye drops. This effect is used mostly in wedding photography. I don’t see it too often in nature photography, so I thought I would give it a try.

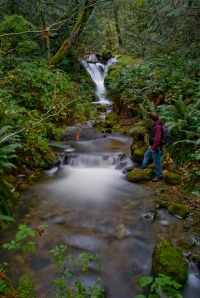
Here is an intimate shot of Lois River near Eagle Falls in Powell River. The colour of the main rock in the image jumped out at me when I captured this shot last year. I thought I would apply the selective focus technique to really make the rock pop. Nothing against the original image, but adding this new application made me fall for this shot in a new way.

As captured in camera

After applying Selective Focus effect in Photoshop

Here’s one of my favourite shots of Saltery Falls, the very first bit of eye-candy you get when you start the 180 km Sunshine Coast Trail. I set up this shot on my tripod and used my self timer to add the human element to a magnificent natural scene. By placing a person in the shot, me, the image becomes more appealing to tourism marketers. Again, I like the original shot just fine. But there is something so cool about the new and improved shot post-effect.

Mushrooms anyone?

Here’s one last example of the effect as applied on this panoramic interior shot of Powell River’s historic Patricia Theatre. Once again, the sharp-as-a-tack image is commercial ready in itself, but considering it is like a time-warp inside the theatre I would try that effect here.

As shot

I woke up and it was 1930

The selective focus method has made me go back into some of my old files for some reworking. It is a lot of fun to see images you forgot you had and bring them back onto your desktop. I anticipate a whole lot of experimental fun with this new technique….for about a week 🙂

But that is ok, because this kind of fun cost me nothing. I am completely guilt-free and I didn’t have to add any more weight to an already back-cramping camera bag. And my Armageddon-enducing Death Filter? It is now a lovely colourful beer coaster for my cold bottle of Miller. Reduce, Re-use, Re-cycle.

Cheers!

PS. For those that want to know how to apply the selective focus effect in post, visit http://www.elementsvillage.com/forums/showthread.php?t=47882

Tunnel vision to the extreme

People are nature too, no?

So those of you that know me and my photography, likely know that my passion is outdoor/landscape/nature imagery. I don’t delve too much into the world of portraiture. You know, the world that actually pays!! But photography to me, has never been about the cash. I know, how Eddie Vedder of me to say, but I gain more satisfaction from the art of photography, rather than the financial gains. The truth is though, the business realities of photography simply shouldn’t be ignored any longer. Besides, expanding my business to include portraiture doesn’t mean I cannot incorporate nature into the assignment shoots, right?

So when my friend, a local realtor, asked me last week if I wouldn’t mind providing him with some professional headshots, I immediately thought – what better way to see if this portraiture-world was right for me. Or at the very least, see if the whole experience would send me running to the nearest waterfall, frantically trying to re-ingite my lost love for the finer art. Ok, I’ll give it a try.

We started off at the Powell River Rec Complex. Beautiful trees with fall colours and an awesome bridge pathway made for great backdrops. It didn’t take too long to discover that I actually kind of like this 🙂

Darren Robinson Photography

Darren Robinson Photography

Darren Robinson Photography

Darren Robinson Photography

Darren Robinson Photography

 We then headed to Townsite, which would offer up a chance to put Josh in front of some character homes. He is a realtor, made sense to show him being one 🙂

Darren Robinson Photography

Darren Robinson Photography

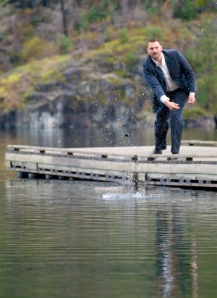
We then decided to hit the lake. Incorporating even more nature into this shoot? I’m in. Josh even decided to skip a few stones at the end and show even more personality. Keeping your models comfortable is key to any good shoot and I could see Josh really starting to find his groove.

Darren Robinson Photography

Darren Robinson Photography

We were getting some really good stuff, so we thought we would try one more locale to make sure we got everything we needed. I am really glad we did because this last spot rendered what I believe are the strongest images. A rustic wood deck and chair was all that we needed to round out a fairly successful portrait session.

Darren Robinson Photography

Darren Robinson Photography

All in all, I am quite pleased with the overall experience. I discovered that shooting people can be just as rewarding as catching a mountain reflection on a lake. And in my case, even more challenging. With that said, I will now be putting together a plan to expand Darren Robinson Photography to offer portraiture services in the near future. Feel free to contact me if you are interested in learning more about them!

I do admit however, that my very next shoot will likely involve silence, the outdoors, and likely a whole lot of nature, without the human element 🙂

The Importance of Balance in Imagery; Achieving Visual Zen

Balance. Such a pleasing word isn’t it. We live our lives in search of it, whether it be a work/life balance, or perhaps a well-balanced diet. Sometimes, we simply strive for balance when standing, depending on how many wobbly pops we’ve that night. Look up balance in the thesaurus and you can instantly see why we yearn for such a thing. Harmony, peace, stability, poise, composure, even steven (yup, it’s in there); these are all things we as humans tend to strive for. When balance is acheived, we tend to be at one with the world, far away from the vaccum-sucking power of chaos.

Ohmmmmmm.

Okay, I’m back. My point here is that there lies deep within our psyche, a yearning for…balance. We then could assume, that we seek the same controlled outcome within our imagery. One thing that myself and Kelly Funk stress within our Coast in Focus photography workshops, is the importance of a balanced composition. Time to bring in the visuals.

Haslam Lake in Powell River, BC

So, what does balance mean within the realm of photographic imaging? It means that the image is evenly weighted within its borders. Take the image of Haslam Lake here. Balance is achieved thanks to some pre-thought elements found within the environment. First of all, the clouds are a bit more vibrant and fluffy on the left side of the image. Offering a sense of counter-weight on the right side are those two rocks protruding from the lake shallows. Zenfullness (couldn’t find this on dictionary.com, but it sounded right) is present within the vertical split of the image (left vs right). Now, to achieve a similar state of  higher Zendom within the horizontal split (top vs bottom) I needed a foreground anchor balance. Something that even-stevens the weight of the upper half of the image in the clouds, mountains and blue sky. My solution was to make that rock on the lower left side of the image the anchor.

Voila! The image can now be hung safely on the walls of yoga studios everywhere without disturbing even the shakiest Downward Dog pose.

So what does an imbalanced image look like? When the image doesn’t successfully keep your eyes moving within it, and instead drives your attention to one side vs the other, the image is unstable and may self-destruct without ample warning. Not really, but hopefully you get my point. Imbalanced images tend to create uneasiness in the viewer, if you feel that, chances are balance is missing from the image. The easiest way to achieve imbalance, is with a crooked horizon line. Watch those very closely.

Straight horizon line

Crooked horizon line tipping the image

The yellow line was drawn in Photoshop to show how important a straight horizon line is to achieving visual balance. The second image with the crooked horizon line, tends to pull on your chakra, giving the image a heavy left side.

There are times when a crooked horizon line and imbalance offer pleasing results. These are not the norm and are usually the result of trial and error. Wedding and fashion photographers are usually very good at this and the results can render very dynamic and impactful imagery. As with anything, photographic rules should really be considered guidelines. Challenging them can truly be half the fun. Just know that most viewers are effected by balance and tend to appreciate images of the stable variety, over ones that tend to cause neck strain.

Cheers!

Dragon Boat team in Powell River for a calendar photo shoot

Pre-designing your shot ~ the lost art of pre-visualization

When it comes to photography (and most other facets of my life), I tend to be a bit of a winger. Planning and pre-planning does not come naturally to this guy. More often than not, the only thing I know about my next nature shoot is the trail I am going to explore, and which flavour of Nature Valley granola bar I am going to take with me….almond. I must admit, sometimes this renders favourable results as I set almost no expectations, and usually come away with something good, sometimes great. However, I am quickly learning that the lost arts of pre-visualization and pre-planning need to be utilized on a more regular basis.

There are tremendous benefits to pre-planning my shot before I put my car key in the ignition. For one, it saves me time. Knowing what I am going to shoot before I shoot it? How could that not ensure I maximize my time in the field and get back in time for the next gripping episode of Dexter. There is also the challenge of it all, especially to a self-admitted winger. Planning and pre-visualizing my next shot puts me outside my comfort zone, and I like that.

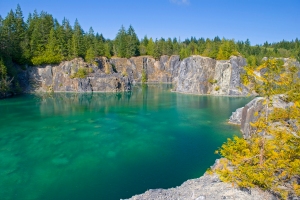
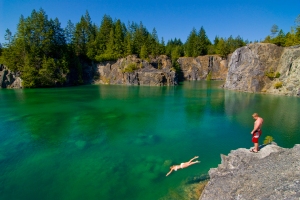
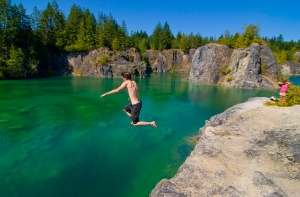
There is a lake on Texada Island called Heyshelt Lake, or Hayshelt Lake, or Hoyscholdt Lake, something to that effect (the jury is still out on the name of this gem and it hasn’t graced any map I have ever seen). It should be called Holy Shit Lake, because once you fix your eyes on it you won’t believe that a place this overwhelmingly stunning actually exists.

quarry lake on my first visit in 2009

 It is a quarry lake, meaning that the rich minerals from the surrounding rock quarries are the reason this lake is the colour it is. Catching the beauty of this lake on camera, that was the easy part, real easy. I had been here twice before and knew I had to plan someting extraordinary for my third time around and I eagerly looked forward to the challenge. So, I pre-visualized.

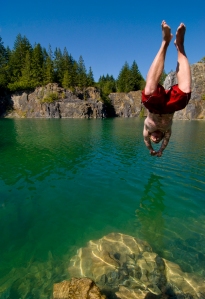
I wanted to showcase diving/swimming in this island paradise, adding the human element (and thus creating a commercial/tourism ready image). The image became clear in my mind. I would be lake level and a diver would drop from the heavens overtop of me into the turquoise waters of Holy Shit Lake. All that was left was to catch the ferry with my models, and make it a reality!

This shot existed in my mind for months, now it's a digital file

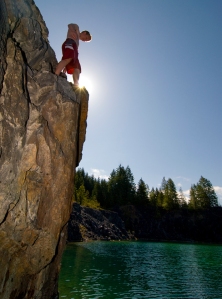
After that pre-shoot visualization took place, other shots surfaced in me noggin that I added to my checklist before shoot day. I wanted to get a shot of the jumper backlit with the sun bursting behind him. Check.

sun bursting off of diver contemplating how lucky he is!

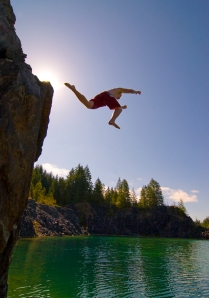
The jump

I also wanted a shot illustrating the romance of it all….two good looking models frolicking in the sexy waters. Done and done.

A couple that dives together....

Several successful images, all pre-planned, captured within 30 minutes of each other…allowing me enough time to take many jumps into the lake myself. Afterall, Dexter was on summer break 🙂

Dexter would want me to jump!

D

Twenty-five days till Coast in Focus!

Well, here we are in May and summer is fast approaching on the appropriately-named Sunshine Coast. For those of you that choose to put your cameras and tripods on the shelf over the off-seasons, now is the time to dust them off and recharge those batteries. And why not brush up on some of your skills and knowledge of the art form by joining us in Powell River for the first ever Coast in Focus workshop, May 28-30. Outdoor Photography Canada magazine contributor, Kelly Funk and myself will be leading our particpants on a weekend of extraordinary field shoots, informative workshops and a straight-up, old-fashioned good time. Our mission is to help you “Unleash Your Creative Side” and we will do so by covering an array of photo topics including Camera Functions, Lighting (natural and artificial), Creative Compositions (the rules and when to best break them), working with subjects, ISO, F-stops and Histograms (demystifying the technical-side), essential equipment (filters, tripods, etc) and working in the field.

We have capped the event at 20 people to ensure optimal one-on-one time for our participants. Join us in some of the most captivating locales (and some of the best places to learn) in the Powell River area for the west coast photography event of the year! E-mail me at darren@darrenrobinsonphotography.com or call (604) 485-4427 to book.

See you soon!

Shooting Eagle Falls

Confessions of a Waterfall Junkie

Anybody else feel incredibly moved by the power of a waterfall? Anybody feel more connected, whether it’s to nature, to a partner or loved one, or perhaps to something bigger than us when in the midst of water crashing to the ground right before your eyes? If you are familiar with, and yearn for this connection, then Powell River should be your destination of choice in 2010.

Eagle Falls

It was this passion for falling water that fuelled my love for photography. Shooting waterfalls can be fun, challenging and rewarding, but arguably the best part of the mission for me is getting there. The fresh smells of the rainforest trail, the sound of plunging water getting louder by the second, the anticipation of that connection I spoke of earlier, each moment contributes to the overall journey. I’ve seen, and shot, many waterfalls in my time, from iconic ones like Athabasca Falls in the Canadian Rockies, to some lesser-known gems like Saltery Falls right here in Powell River.

Athabasca Falls Winter Dance

Upper Eagle Falls

No matter the waterfall, the connection is always the desired end-result. And in some cases, it is these lesser-known waterfalls that offer the more enriching experience. Although Athabasca Falls is thunderously captivating, with its blue-green hues and towering mountains as its backdrop, the journey is not much more than a 5-minute walk from the parking lot. You certainly feel the falls when you get to it, just don’t expect to feel it in privacy.

Waterfall in Johnston Canyon, Banff National Park

In my many treks to the iconic falls of Jasper, I have never seen it stark of tourists, not even in the winter. This is where those less iconic waterfalls fill the emotional gap, and they do it extremely well here on the upper Sunshine Coast.

Saltery Falls along the Sunshine Coast Trail in Powell River

The Blackwater Trail, in rural Powell River is a prime example of how the experience effectively works as a whole, how a perfect connection is achieved. As part of an awe-inspiring circuit of interconnected trails that make up the Duck Lake/Mud Lake Trail system, the Blackwater Trail is a 4-km loop that offers some of the best rugged rainforest terrain, climaxing with not one breathtaking waterfall, but two. This hike is so diverse that even the drive up to the trailhead is rewarding, passing through aspen groves, alongside beautiful lakes and powerful rivers. Once at the trail head, the trek begins with an unmistakable attack on your senses. Every turn reminds you that you are in the heart of BC’s west coast rainforest. The rich greens and browns provide a wild sense of peace and tranquility. As the trail continues along the Blackwater Creek, the anticipation continues to build as the terrain becomes slightly steeper and the sound of the creek begins to intensify. At about 1.5 km, the trail delivers its first stunning waterfall; Kelly Falls.

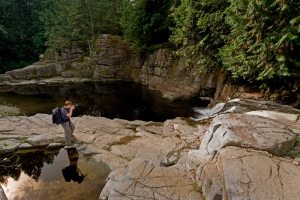
Taking in Kelly Falls along the Blackwater Trail

Although it’s easy to mistake the waterfall site with the rainforest oasis found in the Endor Village, home of George Lucas’ Ewoks, make no mistake this is Powell River. The twenty (ish) foot waterfall plunges through open terrain, offering many inspiring vistas and perspectives to consider.

Best of all, hikers are led straight to the heart of the waterfall by a rustic, yet immaculately built boardwalk that crosses the creek. Thanks to the tireless efforts of Powell River’s own BOMB (Bloody Old Men’s Brigade) Squad, these boardwalks are common to this trail system and greatly enhance the enjoyment of, and accessibility to trail highlights. Complete with a walk-in campsite and picnic table, Kelly Falls is a must-see for those that enjoy experiencing the unmistakable pulse offered by such rugged nature. But your day of discovery does not end here, time to get back on the trail and ascend towards the second waterfall, David Lam Falls.

Spectacular David Lam Falls along Blackwater Trail

Standing at an impressive sixty (ish) feet tall, David Lam Falls is considered one of the tallest of its kind on the upper Sunshine Coast. The trail winds down towards the base of the falls complete with a standing platform for optimal viewing (and feeling). The invigorating spray of this falls is a reminder of just how powerful this wilderness is and how nature can rock the very foundation of one’s soul, at least the soul of an admitted waterfall geek anyways.

For more information on the Duck Lake/Mud Lake Trail System and for an online map, visit http://www.discoverpowellriver.com and click the maps tab. The Coast in Focus photography workshop is now half full, so be sure to contact me today to secure your spot for the May 28-30 event. We’ll definitely get out to one, if not several of these Sunshine Coast waterfalls to shoot!

Flooded River near Duck Lake Trails

Welcome to Darren Robinson Photography

Hi friends. Welcome to my blog. I will keep most of my images on my main website at www.darrenrobinsonphotography.com and on my online galleries at www.drobphoto.smugmug.com.

Stay tuned for information on COAST IN FOCUS spring photography workshop in Powell River on BC’s Sunshine Coast. I cannot imagine a more perfect setting to learn how to take better images with the help of professional photographers including myself, Kelly Funk www.naturalwonders.ca and Emma Levez Larocque www.lensandquill.com. The event takes place in May 2010 and details will be posted here very soon!!  Hope to see you there!